People who follow railways may not realize it, but rail joints are one of the weakest links in track structure — together with curves and turnouts they form the “three vulnerable spots.” As trains run faster and heavier, the probability of joint problems rises and maintenance costs follow. Some statistics show that maintenance of line joints can account for 35%–40% of total maintenance costs. If we want trains to run smoothly and safely, fixing joint defects is a top priority.
First, what does a good rail joint need to meet?
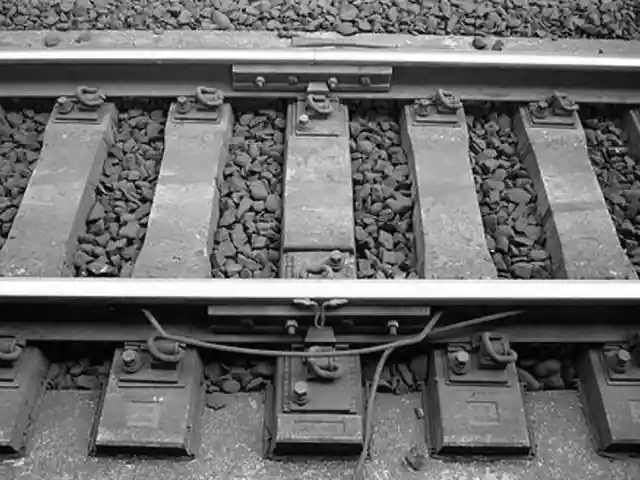
Before maintaining a joint we must be clear about the standard — a “qualified” joint is not just two rails bolted together. Practically speaking, a proper joint must satisfy four core requirements:
Accurate alignment. Whether it’s an overhanging (unsupported) joint or a supported (bearing-pad) joint, the two rails must line up laterally and longitudinally. The joint should sit squarely in the center of the sleeper (tie) or in the center of the rail seat. (Note: supported-pad style joints tend to shorten sleeper life; in practice try to avoid them when possible.)
Even load distribution. Under a passing train the joint area should carry load in the same way as the adjacent track—vertical and lateral deformation and shape should be consistent with the rest of the rail, not behave differently.
No thermal “walking” on stress-relieved track. On stress-relieved (frozen) track, thermal expansion/contraction must not cause noticeable relative displacement across the joint — any movement should be negligible.
Controlled flexibility on CWR buffer zones. Welded (continuous welded rail) joints must be immobile, but the first joint within the buffer zone may be allowed slight movement — only within the specified construction rail gap allowed by the industry standard.
These requirements look simple on paper, but they conflict with routine maintenance needs and with the physical properties of rails. For example, you want even load distribution but you also sometimes need the joint to allow slight movement — so accurate diagnosis of the root cause is essential to prescribe the correct remedy.
(Want to solve your rail system problems?Contact us )
Key defects, their causes and remedies — the five most common joint problems
Below are five common joint defects with practical cause analysis and step-by-step treatment suggestions.
1) “Skewed” joint (rail end leans to one side) — how to fix direction drift
What it looks like: The rail end at the joint leans or “pivots” to one side.
Causes
Handling errors: when rails are unloaded or stacked they weren’t stood on end properly, so they have different ends/centers and later aren’t reset.
Track geometry and usage: short-radius curves, hardened bends or insufficient rail resilience; repeated lateral impact from trains that bend the fishplates (joint bars) or loosen bolts; rail gaps that were squeezed too tight; un-compacted ballast, broken sleepers, soft subgrade, or voids under the rail (overhang/unsupported areas).
Remedies
First restore alignment: straighten the track — on straight track bring it true, on curves realign to design curve geometry. If the joint remains skewed, check whether the fishplates are bent — if so swap the inner/outer fishplates or replace them. Adjust rail gap, then torque bolts properly and apply anti-corrosion oil to fishplates.
“Set the bone” of the rail: perform rail straightening preferably in warm months, replace damaged sleepers, and lock and stabilize the track and subgrade. On curves add extra outer-rail ballast to raise the outer rail and increase lateral stability.
Lateral adjustment technique: when shifting the rail outward (toward curve outside), excavate ballast at the rail “waist” (midspan near the joint), leave ballast under the two sleepers adjacent to the joint less disturbed, and use a lining machine or pry bar to push at the rail waist; leave about 10 mm extra allowance to counter springback. When shifting inward, reverse the procedure (excavate at the joint, concentrate force on the inner side).
Finish by refilling and compacting the ballast, and on the outer rail of curves add more ballast. Repeat small adjustments until alignment is correct.
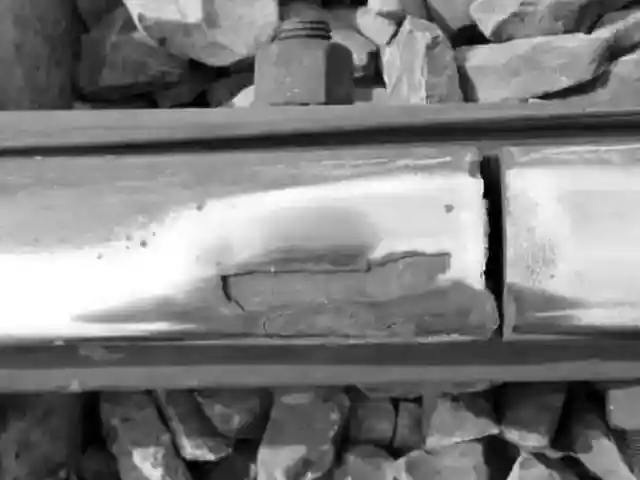
2) Rail head crushing, wear, or spalling (“top-surface damage”) — how to repair a damaged rail head
What it looks like: The rail head at the joint is crushed, gouged, or the surface layer has flaked off.
Causes
Improper heat treatment during hardening (rail too hard or too brittle); oversized rail gaps that amplify impact; burrs or “fat edges” on the rail head from poor processing or inclusions.
Thermal expansion can lift rail ends (spalling) when gaps are too tight; vertical misalignment or lateral step exceeds tolerances (industry specifies step ≤ 0.2 mm, angular deviation ≤ 4.5×10⁻³ radians).
Poor ballast or subgrade (very stiff or very soft) producing excessive impact at the joint.
Remedies
Basic prep: grind down any step faults and set rail gaps correctly; use track stabilization technologies and products to reduce impact (e.g., track-reinforcement products or techniques).
Repair the rail head: remove fat edges by cutting/grinding; severely damaged rails should be replaced or welded and repaired; where height differences exist, grind to create a gentle ramp no steeper than 1‰ (1 per mille); very severe defects require renewal or welded repair.
Increase resilience: chamfer rail ends, remove compacted/solidified ballast, perform comprehensive tamping/tamping around the joint (“all-around tamping”), and install high-elasticity rail pads.
For very severe head damage, use rail welding repair techniques.

3) Low joint (vertical dip at the joint, the “bump/dip” problem) — how to correct vertical misalignment
What it looks like: The joint is lower than the rest of the rail — a vertical depression that causes a noticeable jolt when trains pass.
Causes
Preexisting head damage (see above) increases impact loading and causes progressive sinking.
Poor tamping/compaction leading to voids or hollow spots; damaged sleepers with reduced bearing capacity.
Bent fishplates or loose fastenings causing vertical play; longitudinal track movement displacing sleepers and enlarging gaps.
Remedies
Direct repair: minor dips can be remedied by grinding or welding; full replacement is costly so choose the most economical approach that ensures safety.
Under-rail packing: at suitable temperatures, insert temporary shims (e.g., bamboo shims historically used) under the rail — maximum two shims and total shim thickness ≤ 10 mm. After several days of settling, replace with high-elasticity rubber pads and height-adjustable fastenings. If settlement is large, remove pads, perform comprehensive tamping, then reinsert thin pads and finally swap to the high-elastic pads once stable.
Replace worn components: damaged sleepers must be replaced (replace both sleepers under the joint as a pair for timber sleepers); replace bent fishplates and focus on tamping after replacement.
Smart rail swaps: where possible swap a defective rail with a sound rail so two good rails form a pair.
Preventive measures: during maintenance make sure joint lift (the amount the rail is raised for tamping) is 2–4 mm higher than adjacent track; ensure ramp/grading ≤ 1‰; install height-adjustable fastenings, high-elastic pads or A/B-type metal vibration-damping joint bars — choose model by vertical wear (e.g., A0 for 0 mm wear, A4 for 3–4 mm wear) to enlarge wheel–rail contact area and reduce impact.
4) Unsupported rail / voids under rail (overhangs and hollows) — how to fill and stabilize
What it looks like: Ballast or support under the rail is missing or hollowed, leaving rail “suspended” in places or sitting over a hollow.
Causes
Rail defects like spalling or low joints increase vibration and loosen ballast, creating voids.
Poor maintenance practice: incomplete tamping, insufficient lift during lining/raising, starting tamping only on one rail causing the other rail to be unsupported; loose bolts during tamping; debris under sleepers.
Track lifting during lining can allow ballast to roll under sleepers; soft subgrade or track creep; CWR weld irregularities; failing to tamp immediately after sleeper replacement.
Remedies
First repair the rail: grind or weld rails with head damage or dips.
Standardize maintenance: perform comprehensive all-around tamping at problem spots; ensure adequate lift length and correct sequence; pay attention to longitudinal profile.
Lock and secure: timber-sleepers should be secured with anti-creep devices; after tamping re-lock the track; on concrete sleepers tighten fastenings.
Immediate compaction: replace sleepers and tamp immediately; on concrete sleeper sections install temporary ordinary pads and after ~7–8 days replace with high-strength pads and height-adjustable fastenings.
Grind and smooth CWR welds so ramp ≤ 1‰.
5) Ballast collapse (ballast degradation / “ballast washout”) at joints — how to re-stabilize the foundation
What it looks like: Ballast at the joint has been crushed, rounded and displaced; ballast fines migrate to the shoulder or wash out, and after rain the ballast may pump up mud — the track’s foundational integrity is lost.
Causes
Uneven track surface: joint vertical misalignment, oversized gaps, damaged rail ends → large wheel impacts that crush ballast.
Component failure: insufficient fastening torque (loose or failed fastenings) or worn sleeper bearing surfaces that no longer bite into the ballast.
Remedies
Repair rails and components: grind rails, adjust rail gaps, weld or replace damaged joints; replace failed fastenings and joint components.
Renew the ballast bed: break up compacted ballast, screen and remove fouled fines, replace rounded ballast with properly graded stone, replace worn pads, and once track stabilizes switch to high-elastic pads.
Replace sleepers: if sleeper bearing surfaces are polished/rounded and can’t hold ballast, renew sleepers.
Adjust rail gaps: where individual gaps are too large repair or restring the rails; if gaps are commonly oversized, reprofile and re-lay rail to eliminate large gaps.
Final summary — the essentials: early detection and precise action
Rail-joint defects are one of the three chronic trouble spots of track, but they are not unbeatable. The practical keys are act early, act small, act precisely — catch the first signs and fix them before they grow. Always diagnose the root cause before applying a remedy; don’t treat symptoms blindly. With the right diagnosis and the right maintenance measures, rail joints can be made to withstand high speeds and heavy axle loads, keeping trains running steadier and safer.
We Gldiamond specialize in providing comprehensive, safe and efficient integrated rail system solutions. Welcome to contact us! Having focused on rail systems for 16+ years, we’ve helped numerous customers fix their rail-related problems. Professionalism makes us reliable.